
Mini Sweater Challenge
Three Needle Bind-off

Aug
If you are like me, and a great many other knitters I know, you don’t like sewing your knitting together.
Why not try knitting some of the pieces together instead with the three needle bind-off!

The three needle bind-off is most commonly used when connecting shoulder seams though I have seen it used for some seams as well. You can use this if you are knitting flat or in the round, anyplace that you have live stitches and a need for a seam.
Most of the time right now our seams are hidden inside the sweater; when this technique first appeared many of the shoulder seams were on the outside of the sweater and the this type of seam created a visual detail called strapping; now we want no visual distraction from our work and the detail or “strap” is on the inside of the sweater.

Start with the wrong sides of the knitting facing you – the working yarn needs to be on the back piece of knitting and going to the right.
Line up the two needles holding the work side by side, right sides facing each other and wrong sides showing, working yarn on the back needle.
 Insert the 3rd needle knitwise into the first stitch on the front needle and then knitwise into the first stitch on the back needle. Wrap the needle tip and draw the new stitch through both stitches. Two stitches become one – one stitch on the right hand needle.
Repeat for the next two stitches.
 Draw the first stitch on the right hand needle over the second stitch – one stitch bound-off.

*Insert the right hand needle into the next two stitches on the front and back needles. Two stitches on the right hand needle, bind-off one st. Repeat from * until there are no stitches on the left hand needles and only 2 stitches left on the right hand needle.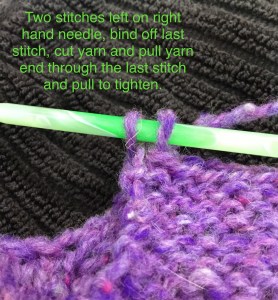
Bind-off one more stitch and then cut the yarn and draw the tail through the remaining stitch. Your shoulder has been connected and looks fabulous!


Happy Knitting!
Lynette